Monday, March 17, 2014

Happy St. Patrick's Day!


Happy St. Patrick's Day!  Today, I'm featuring handmade books in a variety of greens.

https://www.etsy.com/listing/182912759/plantation-mint-tea-recycled-book?ref=shop_home_active_1
These two recycled book are brand new.  One is made from a green Plantation Mint box of tea.  The other box is from a variety of Green Tea.  Both books are available on Etsy!

https://www.etsy.com/listing/182912955/honey-lemon-green-tea-recycled-book?ref=listing-shop-header-1

Wednesday, March 12, 2014

Multiple Stick Book- Art Book 1/14

Remember back in January when I introduced my 14 Art Book in 2014 project?  Well, I finally got around to making my first art book of the year!  January and February were really tough months for me this year.  I had a lot of trouble getting motivated to do things, and spent most of the time curled up on the couch knitting.  (Which is why I have so many knitting posts lately...)  I'm also a competitive figure skater, so this is my peak training season before competition.  Between all of that I did not have time to physically make any art books... But I was planning!

This month I am really kicking things into gear with art books.  I have been invited to be part of a gallery exhibition of book and paper artists that opens in late April.  The artwork deadline is fast approaching and I only have one piece ready for the show!  Yikes!

To get ready for the show, I made a list of pieces I already have and pieces I would like to create for the show.  I want to continue the two themes I've already started with my art books: curly willow branches with ecodyed papers, and Astronomy.  Last week I spent some time after work dyeing papers for future books.  On Monday I had the day off and spent most of the day in my studio.

http://www.flickr.com/photos/25370403@N08/13104976704/in/photostream/
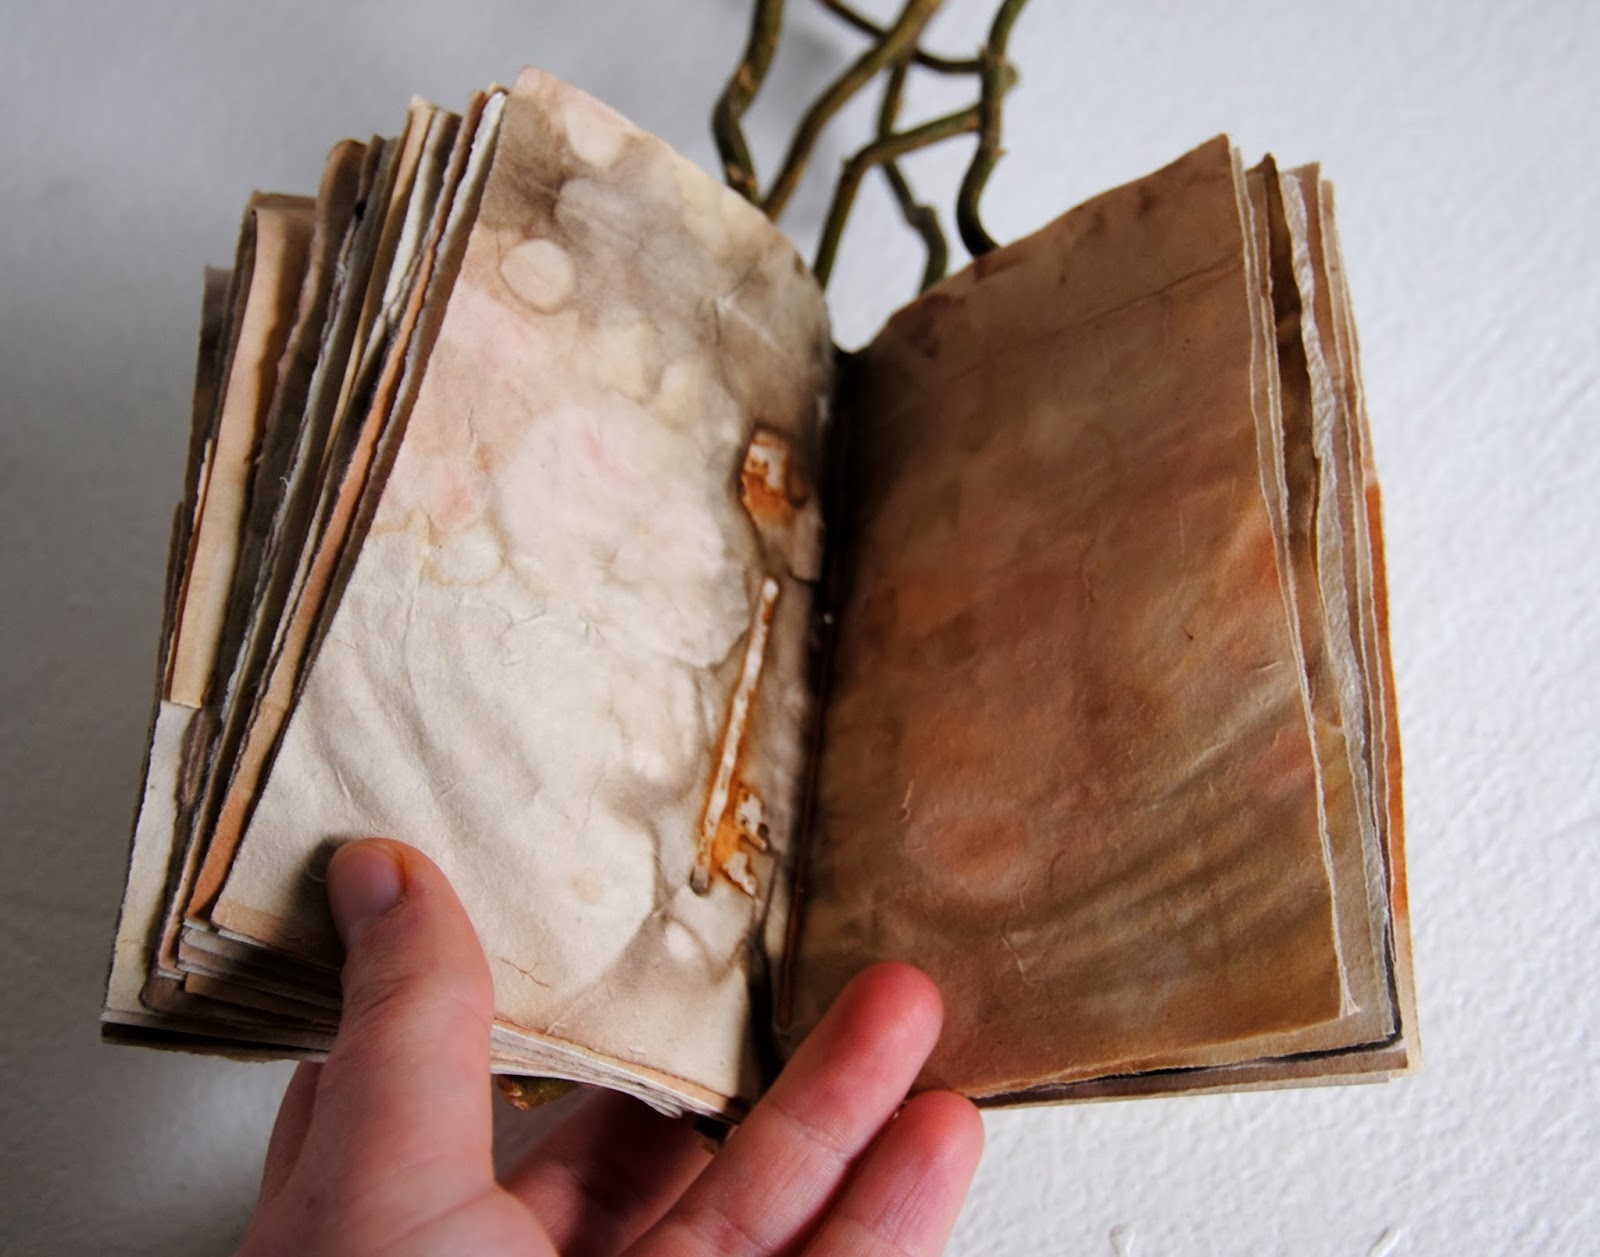
I started by spraying down my new ecodyed papers with water and pressing them under weights to flatten.  I had two sheets of dyed paper from last fall that were already flat, so I used those for the first book.  Then I sorted through my stick collection and found some lovely, skinny, wavy ones.  The idea was to create a multiple signature stick book with one stick for each signature.

http://www.flickr.com/photos/25370403@N08/13104705335/in/photostream/
Once I had my 5 ideal sticks, I tore down the two sheets of dyed paper to 4 1/2 x 6 inch pieces.  I supplemented that with 5 sheets of handmade abaca paper that I made a few years ago.  Then I leafed through my old dictionary and cut out several botanical images for transfers.  Normally I use a blender pen to transfer images that have been through a copy machine, but this time I used the original image and rubbed very hard for a light transfer.  For the covers I used embroidery floss in complementing colors to sew together two smaller pieces of dyed paper.  (Two pieces for each cover.)

http://www.flickr.com/photos/25370403@N08/13104971464/in/photostream/
The hardest part about this book was sewing the signatures to the sticks.  It was tricky figuring out where to attach each stick and how to get the signatures connected securely without much wiggle.  I ended up just winging it, and I think it added to the organic look of the whole book.  I'm very excited with how the book came out, and I think I like it even better than my original Curly Willow Book!
http://www.flickr.com/photos/25370403@N08/13104969144/

Wednesday, March 5, 2014

Lined Journals and Notebooks


https://www.etsy.com/shop/minimeg?section_id=10015474&ref=shopsection_leftnav_1
Over the course of the year I get several requests for lined journals instead of my normal blank journals.  This year I decided it was time to put on my thinking cap, get in the studio, and develop a line (no pun intended) of lined journals.  It took a few weeks of planning, but I'm very excited to share my new product for 2014: lined journals and notebooks!

https://www.etsy.com/listing/181446250/lined-journal-5x7-in-green-basket?ref=shop_home_active_5
The 5x7 inch journals have hard front and back covers with decorative papers and ribbon closures, just like many of my unlined journals.  The paper is a lovely text-weight paper called Mohawk Superfine and each page has dark gray printed lines on both sides of the paper.

https://www.etsy.com/listing/181446250/lined-journal-5x7-in-green-basket?ref=shop_home_active_5
The binding is a coptic stitch sewn with colorful waxed linen thread.  Each book has 120 pages front and back, and is a great size for journaling!  Right now the journals are being sold exclusively on Etsy, but keep an eye out for them this summer at craft shows.

https://www.etsy.com/listing/181590310/lined-notebook-5x7-in-tan-and-aqua?ref=listing-shop-header-1
The lined notebooks are also 5x7 inches, but have a soft cover and only one section of pages.  This is a design completely new to Minimeg!  Each notebook has a section of decorative paper framed on a colorful background.

https://www.etsy.com/listing/181590310/lined-notebook-5x7-in-tan-and-aqua?ref=listing-shop-header-1
The single section of pages is sewn to the cover using a simple pamphlet stitch.  With only 20 pages front and back, the lined notebook is a great size to stash in a day bag for taking notes or using as a travel log on a short trip.  The notebooks are also exclusive to Etsy for now.

https://www.etsy.com/listing/181601051/lined-notebook-5x7-in-red-and-aqua?ref=listing-shop-header-0
Right now this Aqua and Red notebook is my favorite of the lined books!  Which one is your favorite?  Stop by my Facebook page to see photos of all my new lined journals and notebooks.


Friday, February 28, 2014

Paradise Fibers Yarn Club: December

The Paradise Fibers yarn club project for the month of December was a scarf kit with 5 one-ounce skeins of natural fiber novelty yarns.  The yarns in the kit were: Merino Ribbon (a flat open ribbon), Wooly Feathers (sort of hairy like fun fur), Missoula (a springy textured yarn), Mohair Loop (a curly yarn), and Mohair.  All the yarns were in the red/magenta color family with a few touches of purple.

http://www.flickr.com/photos/25370403@N08/12842880494/
Honestly, this is the first month of yarn club that left me unhappy with the yarn choice.  I hate novelty yarns, and the colors this month are my least favorite.  The project was a chunky scarf that basically alternated rows of all the different novelty yarns.  I knit the entire scarf in one day while the city was shut down during the first "polar vortex".  It was something like 13 degrees below zero, before windchill... So knitting was the perfect distraction.  Out of all five yarns, the only two I would consider buying again are Merino Ribbon and Missoula.  They are the least weird out of the bunch.

http://www.flickr.com/photos/25370403@N08/11951684044/
Like I said, this is my least favorite yarn so far... And I mostly knit the scarf to get my $10 in store credit.  I'm hoping to find a friend, family member, coworker, (or even a random stranger) that loves red and can rock this scarf.  It is not really my style, but I know somebody out there would absolutely love it.  Leave a comment if that somebody is you!  (Seriously, I'll send you the scarf.)  Edit 3/4/14- I found an owner for the scarf!  My good friend Fenna from The Honest Badger.  Hopefully I can get a picture of her wearing the scarf to post here.

Tuesday, February 18, 2014

Paradise Fibers Yarn Club: November


http://www.flickr.com/photos/25370403@N08/12549648774/
I realize this post is way overdue, but I finally finished my yarn club project for the month of November.  The deadline for the project was the night before my last holiday craft show.  Between creating inventory for shows and making Christmas presents, this project just didn't get done in time.  The yarn for November was River Twist by Mountain Colors in the colorway Rock Creek.  It is a lovely 100% merino that is plied with two strands that change colors.  Rock Creek is a blend of dark gray, blue, green, and purple.  It almost looks black at first glance, then you notice all the muted colors.

http://www.flickr.com/photos/25370403@N08/11310987486/in/photostream/
The project for the month was a hat with cables called Intersections Break.  I like working with cables and the pattern was easy to follow.  The only thing I didn't like about the pattern was how they figured out the sizes.  My gauge was correct, so the circumference of the hat was fine, but the number of cables for the "small" hat wouldn't have even covered my ears.  I realized this after starting the decrease rows on the evening of the project deadline.  After ripping back a few rows it became clear that I wasn't going to finish 2 more cable repeats and the decrease that evening so I set the project aside.

http://www.flickr.com/photos/25370403@N08/12549138365/in/photostream/
In the meantime I finished knitting my Echo Lodge sweater and picked up again on my colorwork socks from last year.  I also finished the yarn club project for December, which will be posted soon!  This hat ended up being a Valentine's gift for my guy.  Overall, I like the River Twist yarn and would probably order it again for another project.

Saturday, February 15, 2014

Olympic Costumes

Last weekend I went to Toronto for a social ice dancing weekend.  The event was Olympic themed since it took place during the first few days of the Olympics.  I traveled with two of my skating friends from the Ohio/Pennsylvania area and we decided to put together a group costume!  My skating partner had the idea to have the Olympic rings spread across three white sweatshirts.  Since I'm the crafty one, I took his idea and ran with it.

I started out by getting three plain white sweatshirts (which turned out to be the hardest part of the whole process...) and figured out how much space I had on each shirt for decoration.  Then I cut a piece of freezer paper big enough to go over all three shirts.  (If you are unfamiliar with freezer paper stenciling, check out my other blog post about this technique.)  With a little bit of simple math I was able to figure out how big the rings needed to be.  So I set my drawing compass to make the correct size circles (in this case I think about 9 inches across, so 4.5 inches for the compass.)

http://www.flickr.com/photos/25370403@N08/12549151165/
I started by drawing the circle in the middle top row of the logo.  The other two circles in the top row are about an inch away from each other.  Each circle for the bottom row has the center halfway between two of the upper rings, and the top edge lines up with the center of the upper rings.  Once all the large circle were drawn, I set the compass slightly smaller (about half to 3/4 of an inch smaller.)  Then I put the point of the compass back in the same place for each circle to make sure the smaller circles were centered.  From there I erased a few lines and added a few lines to separate the different colored rings where they overlap.

http://www.flickr.com/photos/25370403@N08/12549146555/in/photostream/
The next step is cutting on the lines and getting rid of the "rings" (the part that will be filled with paint.)  I always cut my stencils with an x-acto knife because I'm a cutting ninja.  But you can also do the cutting with scissors if the shape is big enough. Then I cut the large piece into 3 sections, one for each shirt.  Freezer paper is great for stenciling because it can be ironed onto fabric and will peel off easily when you are done.  Sometimes ironing the stencil can be a little fiddly, especially when the stencil has small strips that can bend and get misaligned.  Then it is just a matter of painting the open spaces with fabric paint.  (Unfortunately, the photos are not very dramatic for this project since it is a white stencil on white fabric.)
http://www.flickr.com/photos/25370403@N08/12549142225/in/photostream/

Wednesday, February 5, 2014

Wool-Eater Blanket: Complete!


http://www.flickr.com/photos/25370403@N08/12330551113/
After two years, my crocheted Wool-Eater blanket is finally complete!  When I looked back to see what my last in-progress post was on this project, I realized it was over a year ago... Whoops.  I originally started this blanket on Super Bowl Sunday in 2012 as a way to pass the time and use up some leftover yarn.   My original plan was to finish the blanket before Super Bowl Sunday of 2013, but that didn't happen.  We had two extremely warm summers and I had to put the project on hold longer than I expected.  But I did manage to finish the blanket on Super Bowl Sunday of this year.

http://www.flickr.com/photos/25370403@N08/12330410075/in/photostream/
The finished blanket measures 52 x 66 inches, or 4'4 x 5'6.  It is incredibly warm and basically covers my entire couch!  I've been snuggling up under the blanket for a while, but now I can use the blanket without the threat of accidental unraveling.  Next on my project list is a second Wool-Eater pillow, similar to the one I made in 2012.  (Woah, has it been that long already?)  The idea is to use up the last remaining scraps from the second half of the blanket.

http://www.flickr.com/photos/25370403@N08/12330459245/in/photostream/
This blanket isn't just for humans, it is also the cat's favorite!  Frankie (my roommate's cat) will curl up and nap on the Wool-Eater blanket or pillow any chance he gets.  Sometimes he will cry to be let into the living room, just so he can nap on the blanket... Yeah, he's spoiled.  But who doesn't like a good wool blanket?